
As a child, I remember the first time I tasted Rhubarb Dream Bars at my grandmother's kitchen table during a sunny spring afternoon. The sweet, buttery crust and the tangy rhubarb filling created a delightful dance of flavors that brought warmth to my heart. Each bite felt like a hug from her, making this dessert a cherished tradition in our family gatherings.
These Rhubarb Dream Bars are not only easy to make but also a perfect way to celebrate the arrival of spring with its vibrant, tart filling. The smell of baking bars fills the kitchen with nostalgia, making it a comforting treat that everyone will love.
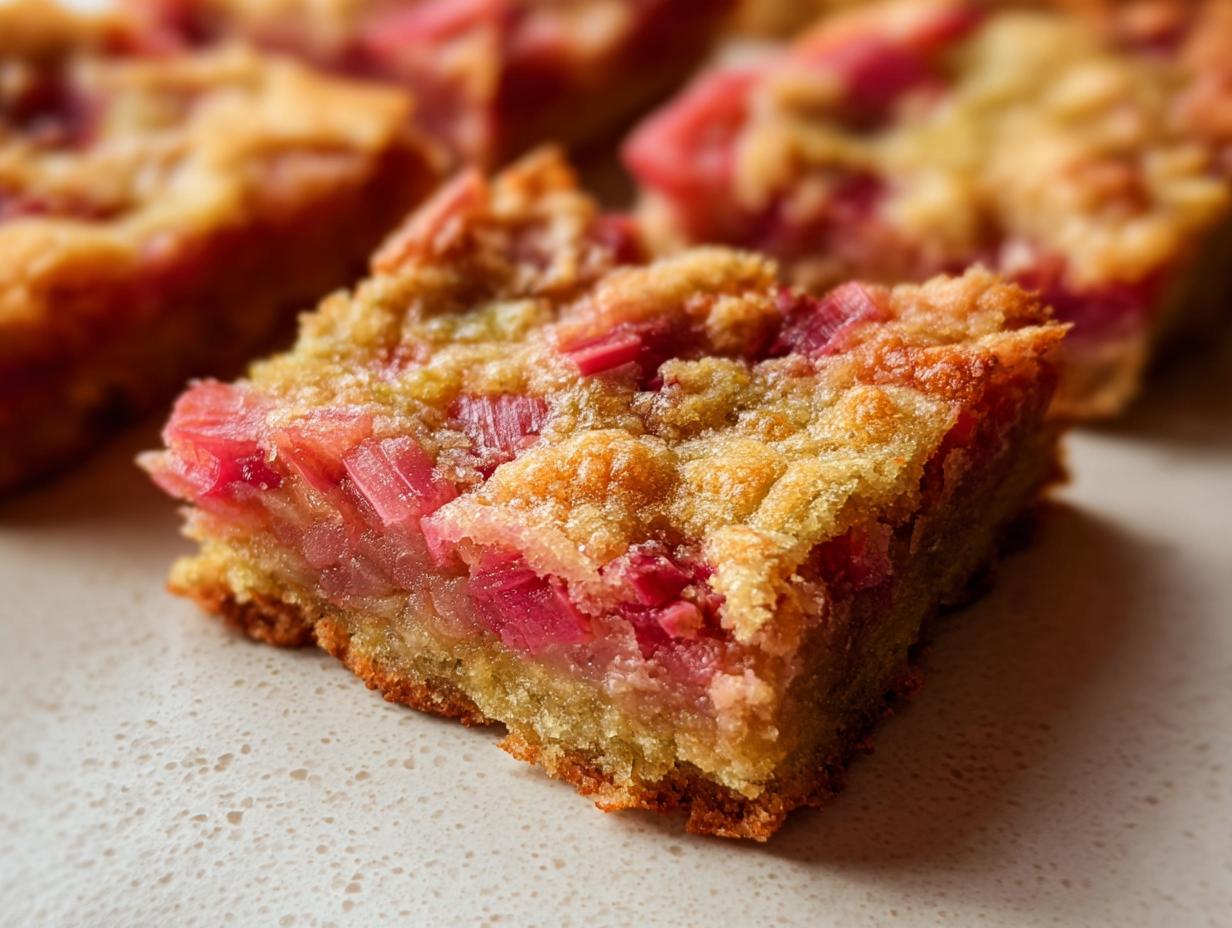
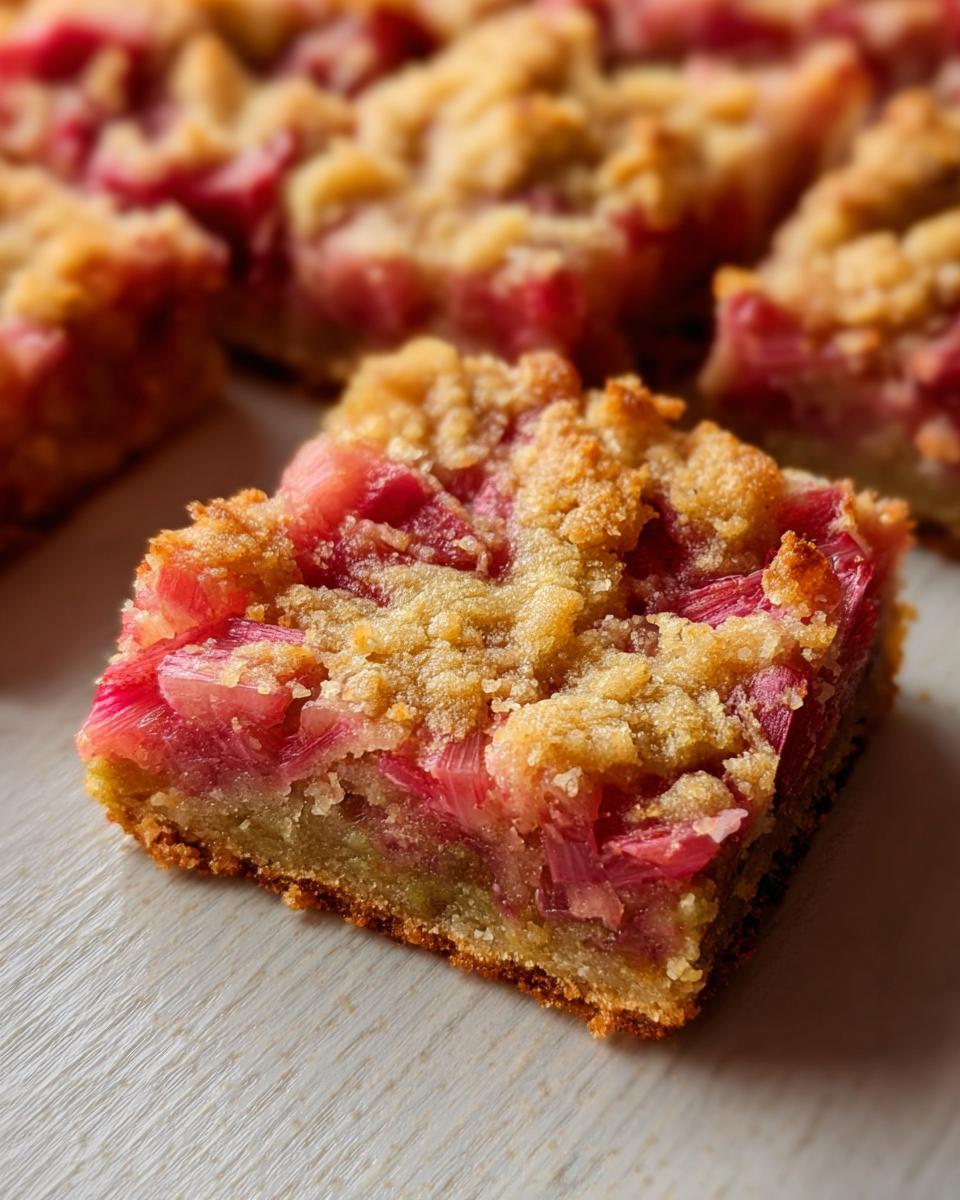
What Is Rhubarb Dream Bars?
Rhubarb Dream Bars are a delightful dessert that combines a sweet, buttery crust with a tangy rhubarb filling, creating a perfect balance of flavors. They are incredibly simple to prepare, making them a go-to recipe for gatherings or a cozy family treat.
- Prep Time: 15 minutes
- Cook Time: 30 minutes
- Total Time: 45 minutes
- Servings: 9 bars
Why You’ll Love Rhubarb Dream Bars
- Quick preparation with just 15 minutes of hands-on time, perfect for busy days.
- Simple ingredients that are often already in your pantry, making it easy to whip up.
- Beginner-friendly method, ensuring that even novice bakers can achieve delicious results.
- Perfect for holidays, potlucks, or family gatherings, delighting both young and old.
- Make-ahead convenience, as these bars taste wonderful chilled or at room temperature.
Ingredients You’ll Need
- For the Crust:
- 1 cup All-purpose flour - Regular flour works best; gluten-free options haven’t been tested.
- ¼ cup Sugar - Granulated sugar gives the perfect sweetness.
- ½ cup Butter - Use softened salted butter for added flavor.
- For the Filling:
- 2 large Eggs - Fresh eggs ensure a rich texture.
- 1 cup Sugar - White sugar is preferred for a clean taste.
- ¼ cup All-purpose flour - This thickens the filling nicely.
- ¼ teaspoon Salt - Enhances the flavor of the rhubarb.
- 2 cups Rhubarb - Fresh or frozen works well; just chop it into small pieces.
When selecting your rhubarb, look for firm, vibrant stalks for the best flavor. If you’re in a pinch, you can substitute with other tart fruits like cranberries for a unique twist!
Ingredient Spotlight
The star of Rhubarb Dream Bars is, of course, the rhubarb. Its tartness beautifully balances the sweetness of the crust and filling, creating a delightful contrast in every bite. This unique flavor is what makes these bars special. If you can’t find rhubarb, consider using tart apples or cranberries for a different yet delicious experience!
Step-by-Step Instructions
Preparing the Crust
- Preheat your oven to 350°F (175°C). This ensures even baking and a golden crust.
- In a mixing bowl, combine 1 cup of all-purpose flour, ¼ cup of sugar, and ½ cup of softened butter. Use a fork or your hands to mix until the mixture resembles coarse crumbs.
- Press the mixture firmly into the bottom of a greased 9-inch baking dish, ensuring an even layer. Pro Tip: Use the bottom of a measuring cup to pack it down nicely for a uniform crust.
Baking the Crust
- Bake the crust in the preheated oven for 15 minutes, or until it is lightly golden brown. The smell will fill your kitchen with warmth and anticipation!
Preparing the Filling
- While the crust is baking, in a separate bowl, whisk together 2 large eggs, 1 cup of sugar, ¼ cup of all-purpose flour, and ¼ teaspoon of salt until well combined.
- Add in 2 cups of chopped rhubarb and gently fold it into the egg mixture. The vibrant color of the rhubarb will brighten your filling and add a tangy sweetness.
Combining and Baking
- Once the crust is baked, carefully pour the rhubarb filling over the hot crust, spreading it evenly with a spatula.
- Return the dish to the oven and bake for an additional 15 minutes, or until the filling is set and slightly puffed. You’ll know it’s ready when it no longer jiggles in the center.
Cooling and Serving
- Once baked, remove the dish from the oven and allow the bars to cool in the pan for about 30 minutes.
- After cooling, cut into squares or bars and serve. These Rhubarb Dream Bars can be enjoyed warm or chilled, and they pair wonderfully with a dollop of whipped cream!
Variations
- Add a teaspoon of vanilla extract to the filling for extra flavor.
- Substitute half of the rhubarb with strawberries for a delightful strawberry-rhubarb twist.
- Try adding a sprinkle of cinnamon or nutmeg to the filling for a warm spice note.
- For a gluten-free version, use a gluten-free all-purpose flour blend in the crust and filling.
Serving and Storage Tips
Serving
Serve the Rhubarb Dream Bars chilled or at room temperature, with a generous dollop of whipped cream or a scoop of vanilla ice cream for a delightful contrast. They make a lovely addition to any spring gathering or family dinner, bringing smiles all around!
Storage
Store any leftovers in an airtight container in the refrigerator for up to 4 days. For longer storage, freeze the bars for up to 3 months. Thaw in the refrigerator overnight before serving, and enjoy their refreshing taste once again!
Common Mistakes
- Using cold butter in the crust - Ensure your butter is at room temperature for a smooth, crumbly texture.
- Not baking the crust long enough - A lightly golden crust is key; underbaking can lead to a soggy base.
- Skipping the cooling step - Allow the bars to cool before cutting to ensure clean, neat slices.
- Using overripe rhubarb - Choose firm, vibrant stalks for the best flavor and texture.
Helpful Notes
- For a richer flavor, consider adding a tablespoon of lemon juice to the filling.
- If you're dairy-free, substitute the butter with coconut oil or a plant-based butter alternative.
- Chop the rhubarb into uniform pieces for even cooking.
- Feel free to experiment with add-ins like chopped nuts or a sprinkle of oats in the crust for extra texture.
Frequently Asked Questions
Can the recipe be frozen?
Yes, Rhubarb Dream Bars can be frozen! Simply allow them to cool completely, then cut them into bars and place them in an airtight container or wrap them individually in plastic wrap. They can be stored in the freezer for up to 3 months. When you’re ready to enjoy them, thaw the bars in the refrigerator overnight.Can ingredients be substituted?
Absolutely! You can substitute the rhubarb with other tart fruits like cranberries or even tart apples for a different twist. If you need a gluten-free option, use a gluten-free all-purpose flour blend in both the crust and the filling. For a dairy-free version, coconut oil or a plant-based butter can replace regular butter.How to store leftovers?
Store any leftover Rhubarb Dream Bars in an airtight container in the refrigerator for up to 4 days. Keeping them covered will maintain their texture and flavor. For longer storage, you can freeze them as well, keeping them fresh for a few months!Can the recipe be made ahead?
Yes, this recipe is perfect for making ahead of time! You can prepare the bars a day or two in advance, allowing the flavors to meld beautifully. Once baked and cooled, store them in the refrigerator or at room temperature, depending on your preference. They are delightful served chilled or at room temperature, making them an excellent option for gatherings or when you need a sweet treat on hand without the last-minute fuss. Enjoying them after a day in the fridge enhances their flavor, making them even more irresistible!Final Thoughts
I hope this recipe for Rhubarb Dream Bars brings as much joy to your kitchen as it has to mine. Whether you’re enjoying them during a family gathering or simply treating yourself on a cozy evening, these bars are sure to delight. Their sweet and tangy flavor is a wonderful reminder of springtime and cherished memories. So gather your loved ones, bake a batch, and relish the smiles that follow. Happy baking!
Rhubarb Dream Bars
Ingredients
Equipment
Method
- Preheat your oven to 350°F (175°C).
- In a bowl, mix the crust ingredients until combined. Press the mixture into the bottom of a greased baking dish.
- Bake the crust for 15 minutes until lightly golden.
- While the crust is baking, prepare the filling by whisking together eggs, sugar, flour, salt, and rhubarb in a separate bowl.
- Pour the filling over the baked crust and return to the oven. Bake for an additional 15 minutes until set.
- Allow to cool before cutting into bars.

Leave a Reply