
As a child, summer days were filled with laughter, sunshine, and the delightful crunch of a chocolate overloaded ice cream cone in my hands. I can still remember the excitement as my family gathered at the local ice cream parlor, each of us choosing our favorite flavors and toppings, creating towering cones that seemed almost too good to eat. This Chocolate Overloaded Ice Cream Cone is a tribute to those blissful moments, blending rich chocolate flavors with creamy ice cream and decadent toppings.
This recipe is special because it invites you to unleash your creativity while indulging in a comforting dessert that’s quick and easy to prepare. With just a handful of simple ingredients, you'll have a delightful treat that brings joy to any occasion, making it perfect for gatherings or a cozy night in.
What Is Chocolate Overloaded Ice Cream Cone?
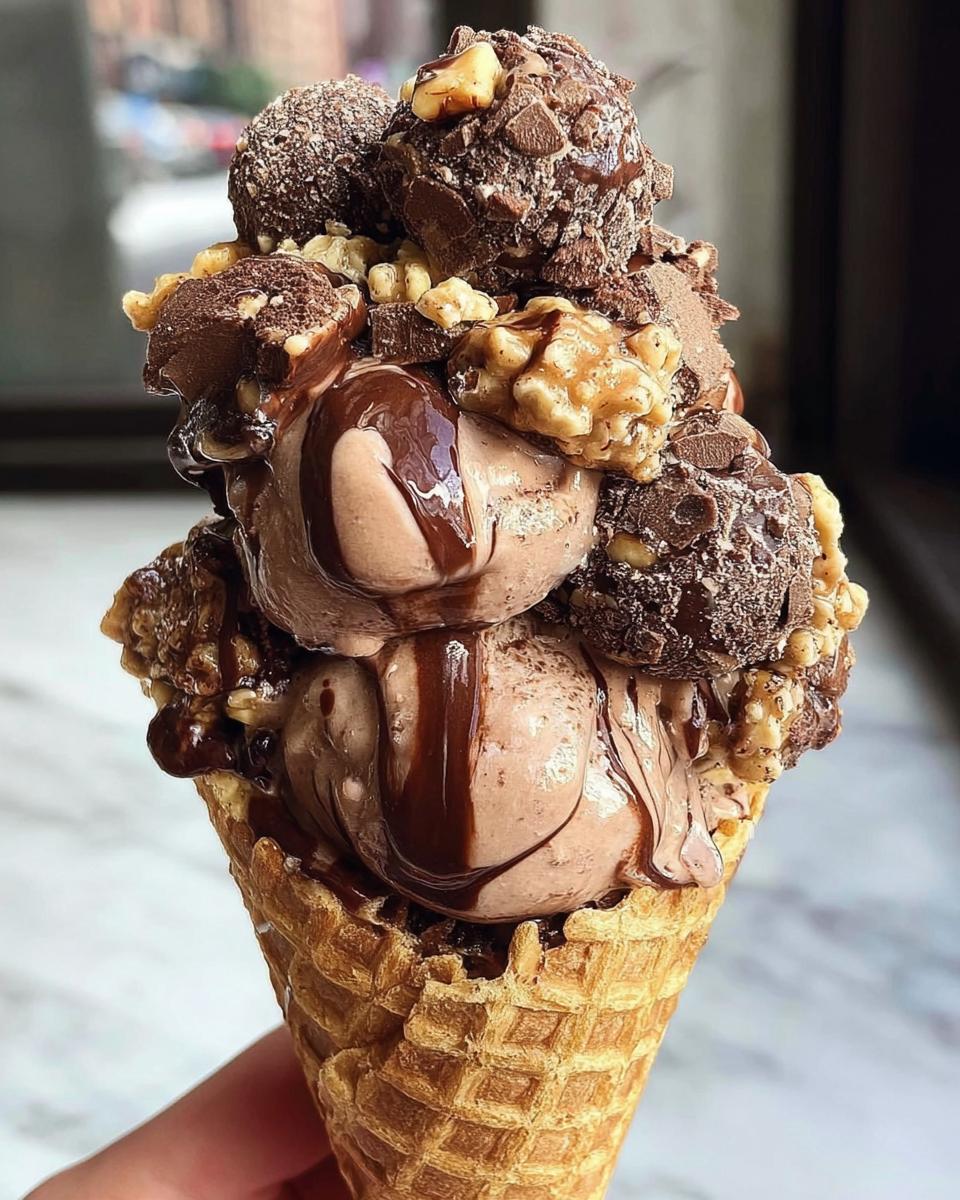
The Chocolate Overloaded Ice Cream Cone is a dream come true for chocolate lovers, combining the delightful crunch of a waffle cone with creamy ice cream and an array of indulgent toppings. This fun and customizable dessert is perfect for hot summer days or any time you crave a sweet treat.
- Prep Time: 15 minutes
- Cook Time: 0 minutes
- Total Time: 15 minutes
- Servings: 2 cones
Why You’ll Love Chocolate Overloaded Ice Cream Cone
- Quick Preparation: In just 15 minutes, you can whip up this delightful dessert, making it perfect for last-minute cravings.
- Simple Ingredients: With just a handful of pantry staples, this recipe is both accessible and affordable, inviting everyone to join in on the fun.
- Beginner-Friendly Method: No baking or complicated techniques are required, so even novice cooks can create an impressive treat.
- Perfect for Gatherings: Whether it's a summer barbecue or a cozy family night, this ice cream cone is sure to bring smiles and sweet memories.
- Make-Ahead Convenience: Prepare the toppings in advance and assemble them just before serving for an effortless dessert experience.
Ingredients You’ll Need
- 2 pieces Waffle cones - sturdy and crispy for the perfect base.
- 2 scoops Vanilla ice cream (or chocolate ice cream) - use high-quality ice cream for the creamiest texture.
- 2 tablespoon Chocolate spread - Nutella or a similar brand adds a luscious layer of chocolatey goodness.
- 50 g Milk chocolate - melted, for drizzling over the top.
- 2 pieces Chocolate chip cookies - crumbled for added crunch.
- 4 pieces Chocolate truffles - Ferrero Rocher style work beautifully for a touch of elegance.
- 2 tablespoon Crushed chocolate cookies - to sprinkle on top.
- 2 tablespoon Chocolate flakes or shaved chocolate - for a decorative finish.
- 2 tablespoon Chocolate chips - the more chocolate, the better!
- 1 tablespoon Crushed hazelnuts (or peanuts) - optional but adds a delightful nutty flavor.
- 1 tablespoon Caramel sauce - optional for a sweet drizzle.
Feel free to mix and match toppings based on your preferences or what you have on hand! If you're looking for a nut-free version, simply omit the hazelnuts and replace any chocolate products with dairy-free alternatives for a vegan twist.
Ingredient Spotlight
The star of our Chocolate Overloaded Ice Cream Cone is undoubtedly the chocolate spread. This rich, velvety layer adds a creamy texture and an intense chocolate flavor that melds perfectly with the ice cream. If you prefer a lighter option, consider using a fruit spread or nut butter for a delightful twist!

Step-by-Step Instructions
Preparing the Cones
- Begin by selecting a stable surface to hold your waffle cones upright. A small plate or a cup can work perfectly.
- Carefully place the two waffle cones in this sturdy position, ensuring they are secure and won’t tip over.
Adding Ice Cream
- Using a large spoon or an ice cream scoop, take two generous scoops of either vanilla or chocolate ice cream.
- Gently press the ice cream into each cone, making sure to fill them to the top for that delightful ice cream mountain look.
Drizzling the Chocolate
- Next, grab your chocolate spread and drizzle it generously over the ice cream, allowing it to cascade down the sides for that mouthwatering effect.
- Now, take your melted milk chocolate and, using a spoon, pour it over the ice cream, ensuring it coats every inch of the top.
Adding Toppings
- Begin layering your toppings by adding crumbled chocolate chip cookies on top of the ice cream.
- Next, gently place your chocolate truffles around the top for a luxurious touch.
- Sprinkle the crushed chocolate cookies, chocolate flakes, and chocolate chips generously to create a beautiful, loaded appearance.
- For an extra crunch, finish with a sprinkle of crushed hazelnuts or peanuts, if using.
Final Touches
- If you’d like to add a sweet twist, drizzle caramel sauce over the entire creation, allowing it to blend with the chocolatey goodness.
- Now, take a moment to admire your masterpiece before diving in. Enjoy your chocolate overloaded ice cream cone!
Variations
- Try using different ice cream flavors like mint chocolate chip or cookies and cream for a fun twist.
- Incorporate seasonal fruits like strawberries or raspberries for a refreshing contrast.
- Substitute the waffle cones with chocolate cones or sugar cones for a different base.
- For a dairy-free version, opt for coconut or almond milk ice cream and vegan chocolate spread.
- Add a sprinkle of sea salt for a delightful sweet and salty combination.
Serving and Storage Tips
Serving
Serve your Chocolate Overloaded Ice Cream Cone immediately for the best texture and flavor. Pair it with a refreshing drink like iced tea or lemonade to balance the sweetness. These cones are perfect for summer gatherings or cozy nights spent with loved ones.
Storage
Assembled cones are best enjoyed fresh, but you can store leftover toppings in an airtight container in the refrigerator for up to a week. If you have leftover ice cream, keep it in the freezer, but avoid storing assembled cones, as the waffle will become soggy.
Common Mistakes
- Using stale or broken waffle cones — always check for freshness to ensure a sturdy base.
- Overfilling the cones with ice cream — leave a little space at the top to avoid spills.
- Not allowing melted chocolate to cool slightly — pouring it too hot can melt the ice cream.
- Skipping the toppings — they add texture and flavor, so don’t hold back on the fun!
Helpful Notes
- For a gluten-free option, use gluten-free waffle cones.
- Consider adding a layer of peanut butter or almond butter for extra richness.
- Use dairy-free ice cream and chocolate spread for a vegan version.
- Experiment with different nuts like walnuts or almonds for various textures.
Frequently Asked Questions
Can the recipe be frozen?
Yes, while the assembled Chocolate Overloaded Ice Cream Cone is best enjoyed fresh, you can freeze the ice cream separately. Just remember that once the cone is assembled, it will become soggy if frozen.
Can ingredients be substituted?
Absolutely! Feel free to swap vanilla ice cream for chocolate, or use any other toppings you prefer. Nut butters can replace chocolate spread, and you can use dairy-free options for a vegan version.
How to store leftovers?
Store any leftover toppings in an airtight container in the refrigerator for up to a week. Keep any remaining ice cream in the freezer, but avoid storing assembled cones to maintain the texture.
Can the recipe be made ahead?
You can prepare the toppings ahead of time and refrigerate them. Just assemble the cones right before serving to ensure everything stays fresh and delicious!
Final Thoughts
As you embark on creating your own Chocolate Overloaded Ice Cream Cone, remember that this delightful dessert is more than just a treat; it's a chance to bond with family and friends. Share the joy of crafting these indulgent cones and let your creativity shine through each layer of deliciousness. I hope this recipe fills your kitchen with laughter and sweetness, creating memories as rich and satisfying as the chocolate itself. Enjoy every bite, and happy scooping!
Chocolate Overloaded Ice Cream Cone
Ingredients
Equipment
Method
- Start by placing the waffle cones upright in a sturdy position.
- Add a scoop of vanilla or chocolate ice cream into each cone.
- Drizzle the chocolate spread over the ice cream.
- Pour the melted milk chocolate on top of the ice cream.
- Add chocolate chip cookies, truffles, crushed cookies, chocolate flakes, chocolate chips, and crushed hazelnuts on top.
- If desired, drizzle caramel sauce over the toppings.
- Enjoy your chocolate overloaded ice cream cone!


Leave a Reply